|
CLUTCH ASSEMBLY Removal |
1. Disconnect the earth strap from the battery. 2. Remove the bonnet, after first marking the fitted position of the hinges to facilitate alignment when refitting. 3. Where fitted, detach the ignition shield from the front of the engine. 4. On models where the ignition coil mounting bracket is attached to one of the cylinder head studs, remove the cylinder head nut retaining the coil bracket and move the coil and bracket to one side out of the way. 5. On later models which have a plastic air intake assembly at the righthand front wing valance, withdraw the intake assembly into the engine compartment after pulling off the flexible pipe from beneath the wing. 6. Where the horn is mounted on the bonnet locking platform, disconnect and remove the horn, where necessary. 7. Disconnect the starter cable from the starter motor. Remove the starter motor from the flywheel housing. 8. Where the ignition or starter solenoid is mounted on the flywheel housing, disconnect the wiring and remove the coil or solenoid. 9. On models with the starter solenoid mounted on right-hand wing valance disconnect the wiring and remove the solenoid. 10. Disconnect the return spring from between the clutch operating lever and the slave cylinder. 11. Remove the nuts securing the radiator upper support bracket to the thermostat housing, and the bolts securing it to the radiator cowl, and remove the bracket. 12. Jack up the front of the car and support on stands located under the front sub-frame side-members. 13. Remove the air cleaner assembly and disconnect the exhaust down-pipe at the manifold flange. From underneath the car, also detach the exhaust pipe clip from the transmission casing. 14. Support the power unit with a hydraulic jack positioned under the transmission casing. 15. Remove the two bolts and nuts securing the righthand engine mounting to the sub-frame side-member. 16. Now raise the power unit sufficiently with the jack to allow the clutch cover retaining bolts and the clutch cover to be removed, but take great care not to let the cooling fan blades damage the radiator core. 17. Remove the cover retaining bolts and detach the clutch cover. Note that the engine earth strap is normally secured by one of the cover front retaining bolts. 18. On very early models (pre September 1964), with the coil spring type clutch remove the three nuts securing the clutch thrust plate to the pressure spring housing and detach the thrust plate 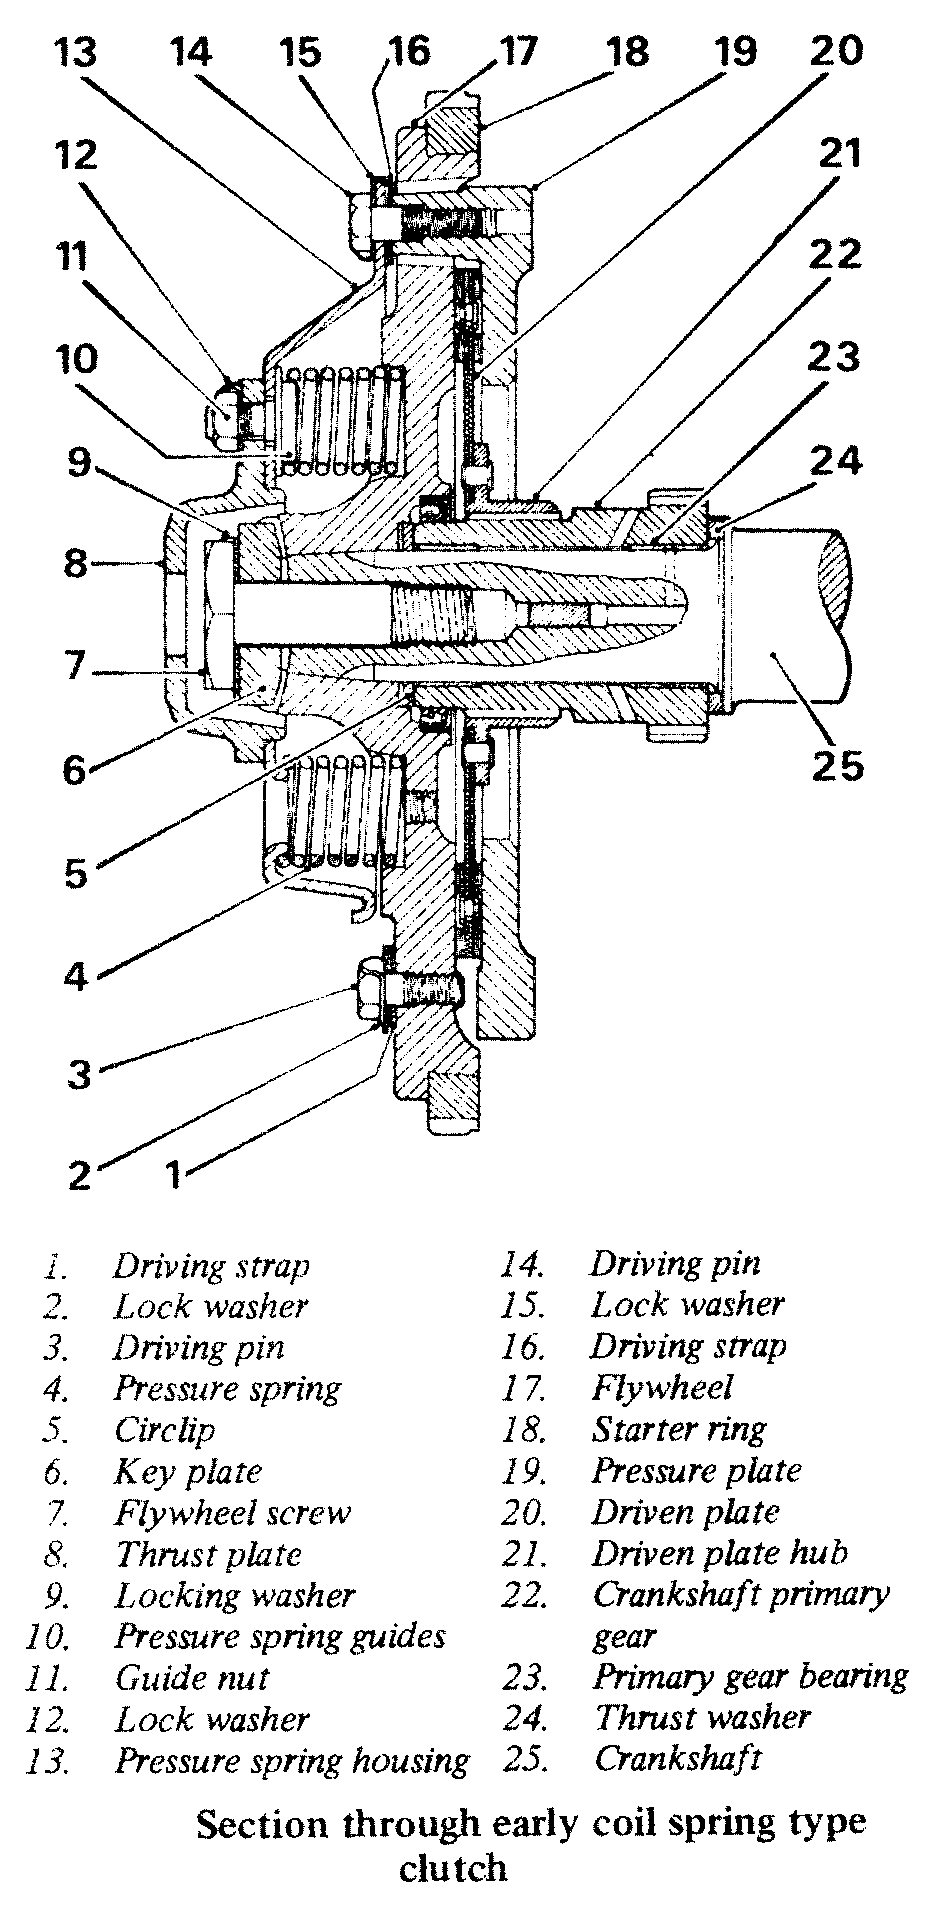 . .19. On models with the diaphragm spring clutch, slacken the three dowel bolts (driving pins) retaining the diaphragm spring cover. Slacken the bolts evenly to release the spring pressure, then remove the bolts and detach the diaphragm cover 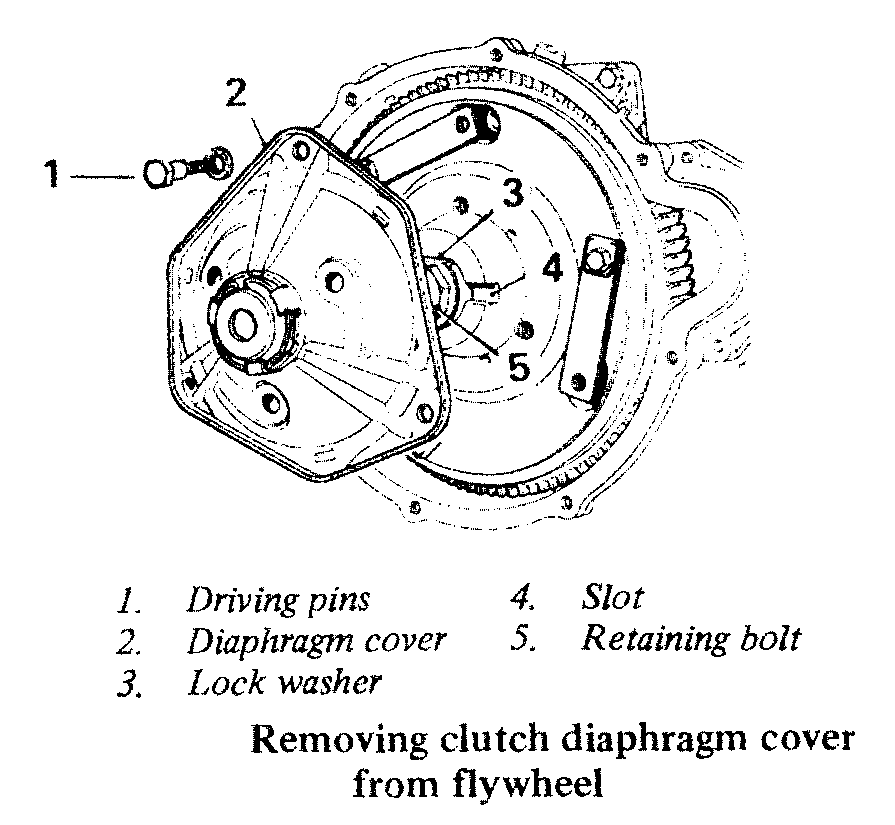 . .20. Turn the crankshaft until the 1/4 timing mark on the outside edge of the flywheel is at TDC position. The slot in the crankshaft and flywheel should now be horizontal. It is essential that the crankshaft be correctly positioned before attempting to remove the flywheel as the 'C' shaped washer which locates the crankshaft primary gear will then be positioned with its open side downwards and thus be unable to drop out. If this precaution is not observed, the 'C' washer may fall out of position and cause severe damage and/or possibly make it impossible to remove the flywheel. 21. Knock back the lock washer tab securing the flywheel retaining bolt. Hold the flywheel to prevent it turning and remove the retaining bolt (11/2 in AF). Remove the keyed washer locating the flywheel to the crankshaft. 22. Withdraw the flywheel off the crankshaft taper using a suitable puller. First locate the thrust button of the puller set into the end of the crankshaft to protect the internal threads 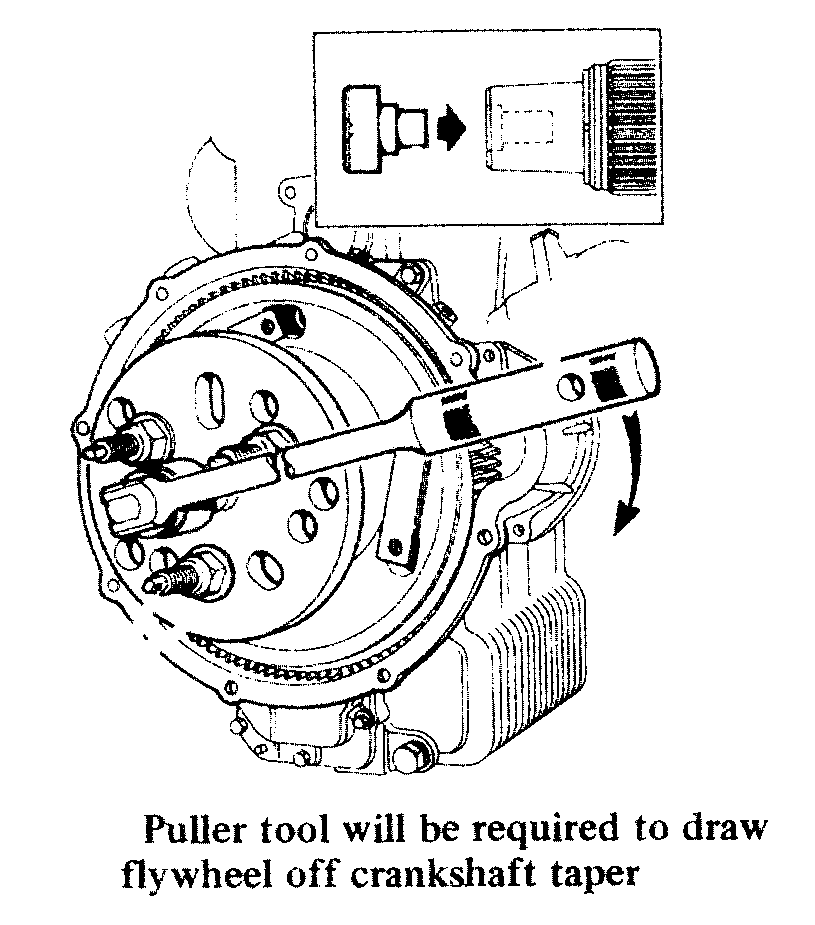 . Screw the three adaptor screws into the threaded holes provided in the flywheel. Fit the plate of the puller tool over the screws and secure with the three nuts. Tighten the nuts evenly so that the plate remains parallel with the flywheel. Screw in the tool centre-bolt until it contacts the thrust button then tighten further while holding the flywheel to prevent it turning. . Screw the three adaptor screws into the threaded holes provided in the flywheel. Fit the plate of the puller tool over the screws and secure with the three nuts. Tighten the nuts evenly so that the plate remains parallel with the flywheel. Screw in the tool centre-bolt until it contacts the thrust button then tighten further while holding the flywheel to prevent it turning. Once the flywheel is freed, the puller can be removed. NOTE: The adaptor screws for use on the diaphragm clutch are different from those for the coil spying clutch and must not be interchanged. 23. On models with the diaphragm spring clutch, remove the flywheel, clutch disc and pressure plate as individual items from the flywheel housing 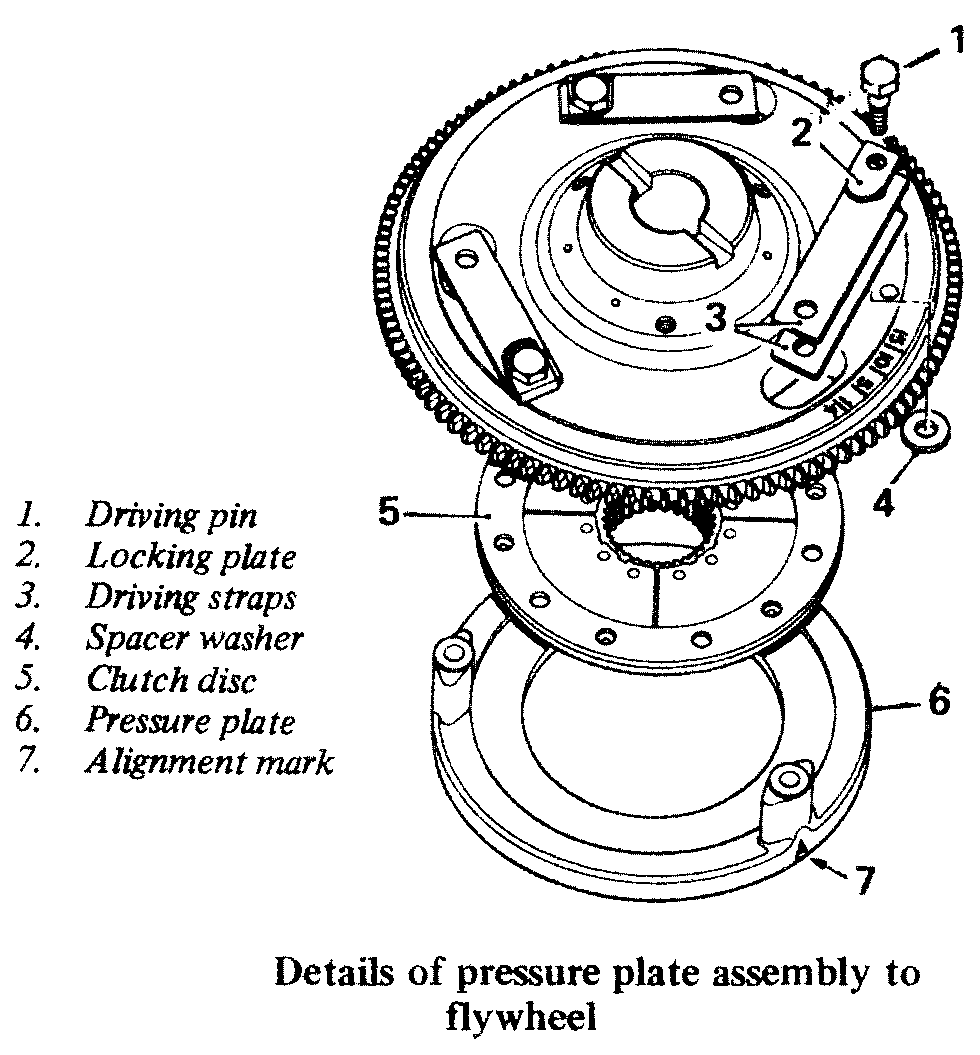 . .24. On early models with the coil spring type clutch, the clutch and flywheel are removed as an assembly. If required, they can be separated as described under the appropriate heading later. NOTE: Very early models have lubricated bushes at the crankshaft primary gear and in this case an additional oil seal fitted to the flywheel As the flywheel is pulled from the shaft, oil from the annulus behind the seal may spill down the face of the flywheel onto the clutch disc and be wrongly interpreted as oil which has leaked past the seal during normal running. The flywheel should be maintained in a vertical position during removal to avoid this oil contaminating the clutch disc linings. Installation Installation is a simple reversal of the removal procedure, with special attention to the following points: a) Ensure that the crankshaft taper and flywheel hub bore are perfectly clean and free from grease. They must be assembled dry. This is most important. b) Lightly smear the splines of the crankshaft primary gear with molybdenum disulphide grease. c) Ensure that the crankshaft is correctly positioned, with the open side of the primary gear 'C' washer facing downwards. d) On very early engines where a flywheel oil seal is fitted, lubricate the oil seal lips before installing the flywheel. Some of these early engines also have a rubber plug fitted into the gear end of the crankshaft as an added precaution against oil leaking past the normal brass taper plug. An improved brass plug was used later and the rubber plug disconnected. e) On the diaphragm. spring clutch, the clutch pressure plate and diaphragm cover are stamped with a balance mark 'A' which must be aligned with the 1/4 timing mark on t wheel  . .f) To assemble the diaphragm spring clutch, first fit the pressure plate into the flywheel housing with the 'A' mark to the top, then fit the clutch disc with the hub facing inwards. Centralise the pressure plate onto the clutch disc then fit the flywheel onto the crankshaft taper so that the 1/4 timing mark aligns with the 'A' mark on the pressure plate . Temporarily fit the three dowel bolts (driving pins) lightly into the pressure plate to align the assembly and pull it together. Once the Flywheel retaining bolt has been fitted and tightened, the dowel bolts can be removed and the diaphragm cover installed with its balance mark 'A' aligned with the 1/4 timing mark . Fit and progressively tighten the three dowel bolts ensuring that they pass squarely through each pair of driving straps. Incorrect assembly can cause 'clutch judder'. Tighten the dowel bolts to 16 lb ft (2.2 kgm).When fitting the flywheel retaining bolt, first align the offset slot in the end of the crankshaft and flywheel, then refit the keyed washer. Fit a new lock washer under the flywheel bolt and tighten the bolt to 115 lb ft (15.5 kg.m), while holding the flywheel to prevent it turning. Secure the bolt with the lock washer tab. h) When assembly is complete, check the clutch stop setting and adjust if necessary as detailed in the 'ROUTINE MAINTENANCE' section previously. Dismantling& Reassembly Coil Spring Type Clutch) Once the flywheel and clutch assembly has been removed from the engine, it can be dismantled as follows: Three screws (Service Tool 18G 304 M) will be required to hold the pressure springs compressed while removing the driving pins  . .Mark the driving pins so that they can be refitted in their original positions. Also note the balance mark 'A' and the clutch spring cover .Insert the three special screws through the holes in the spring cover and screw them into the threaded holes provided in the flywheel. Screw the nuts down against the cover with the fingers, then tighten them one turn at a time until the load is released from the driving pins. Unscrew and remove the three driving pins. Unscrew the three nuts gradually to release the spring cover, then lift off the cover and the springs. The pressure plate will then be released from the flywheel and the individual items can be separated. When reassembling the components, the balance mark 'A' on the pressure plate and spring cover must be aligned with the 1/4 mark on the flywheel . Place the clutch disc on the pressure plate with its longer boss towards the plate. Special Tool 18G 571 will be required to centralise the clutch disc with the flywheel hub. Locate the coil springs, spring housing on the flywheel, then fit the special screws and tighten the nuts evenly to compress the pressure springs. Fit the driving pins in their original locations, ensuring that they pass squarely through each pair of driving straps, and tighten them to 16 lb ft (2.2 kgm). Release the nuts and remove the special screws. |
| Loosen the Flywheel bolt, Spag's tip | "To undo the flywheel bolt just stick a 1/2 inch spanner on one of the nuts and then bolt the other end to the bell housing." see picture on: http://www.spagtime.freeserve.co.uk/strip/  |