|
ALTERNATOR (11 AC Type) |
The 11 AC alternator charging circuit includes an alternator control unit, a field isolating relay and a warning light control unit 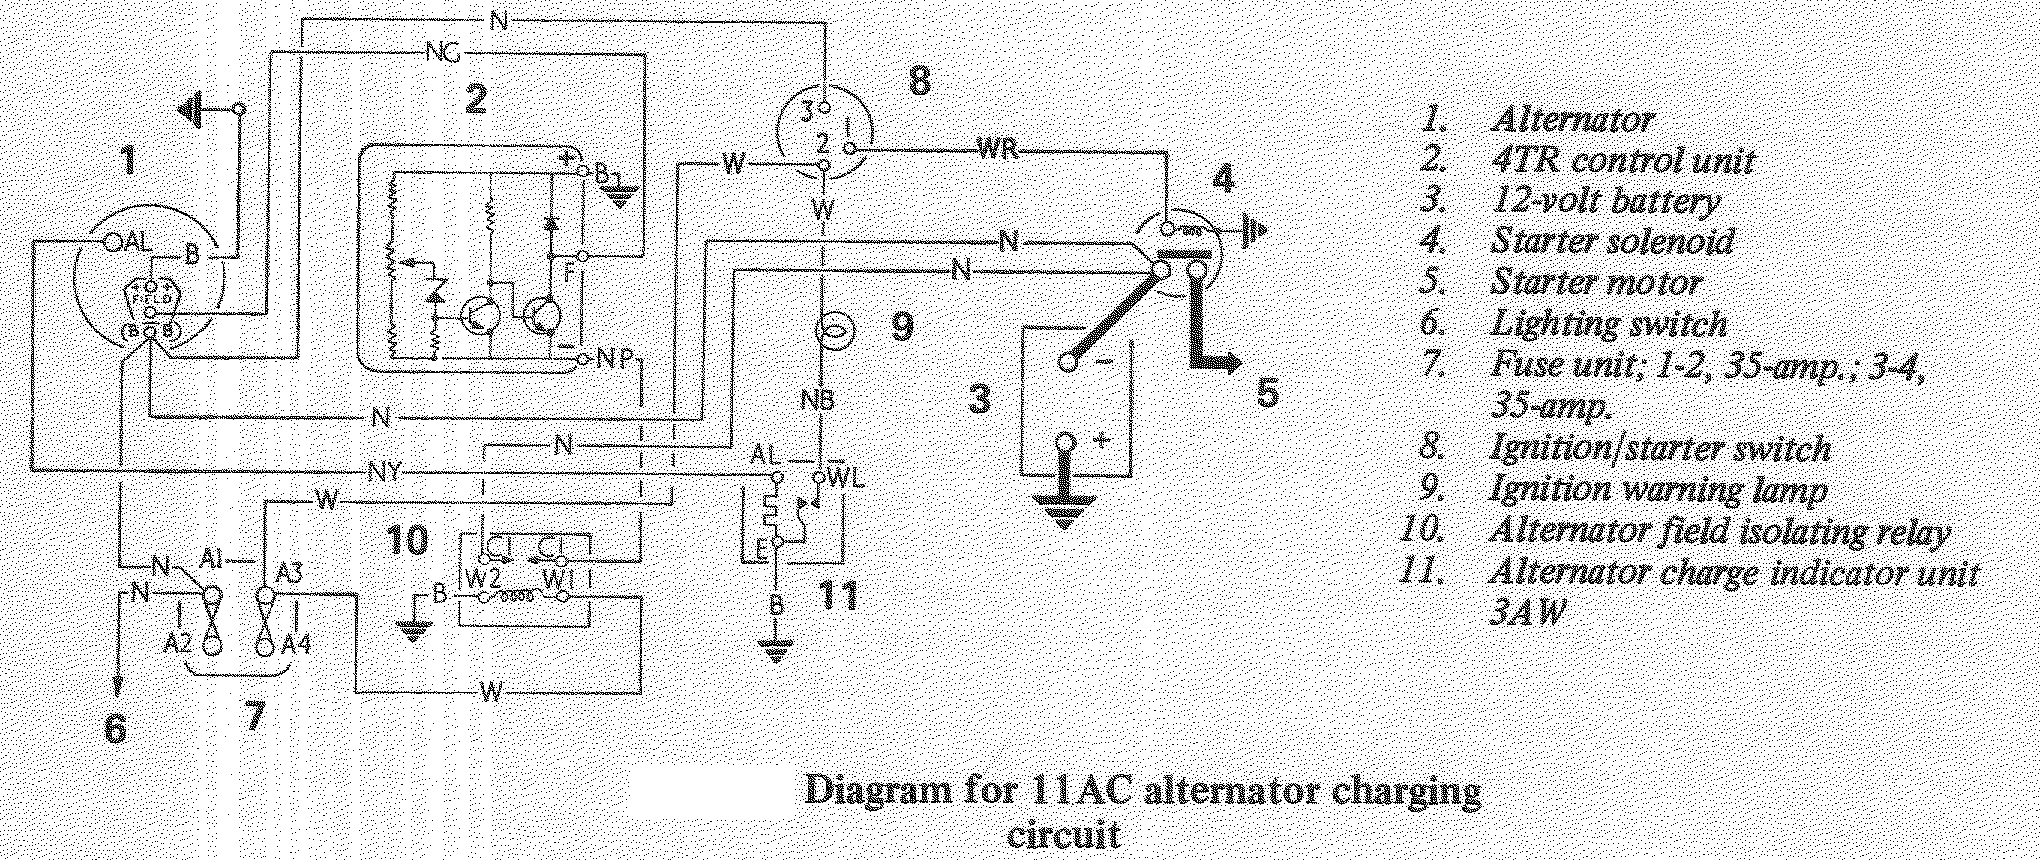 . The electronic control unit is a Lucas 4TR type and is mounted remotely from the alternator. . The electronic control unit is a Lucas 4TR type and is mounted remotely from the alternator. The voltage output is adjustable by means of a potentiometer adjuster at the rear of the control unit, but it is not recommended that this be attempted without proper equipment and knowledge. The Lucas 6RA field isolating relay acts to de-energise the alternator field windings when the engine is stationary by disconnecting the supply from the rotor field immediately the ignition is switched off. If the contacts inside the relay fail to close when the ignition is switched on, the alternator will not generate. The warning light control unit is a thermally operated relay and is electrically connected to the centre point of one pair on diodes in the alternator. It enables a warning light to be used to indicate that the alternator is charging when the engine is running at normal speed. It should be noted that the 3AW control unit is externally similar to the FL5 type indicator flasher unit, and thus is identified by a distinctive green label applied to the aluminium case of the unit. These two types of unit cannot and must not be interchanged. Removal & Installation Removal and installation of the alternator is a straight-forward operation, similar to that described for the dynamo previously. However, in this case it is most important that the battery must be disconnected before starting work on the alternator as the alternator main feed cable is live at all times. Do not reconnect the battery until installation is complete and all leads have been properly reconnected. It should be noted that 'polarisation' of the alternator is not necessary and in fact, if carried out, will probably cause damage to some of the semi-conductor devices in the charging circuit. Brushes Remove the nuts, washers and insulating pieces from the output terminal (B) at the rear of the alternator. Remove the two brush box retaining screws and withdraw the brush box assembly from the rear end bracket. Take care not to lose the two washers fitted between the brush box moulding and the end bracket as these must be refitted in their original locations on reassembly. To remove the brushes from the brush box, close up the retaining tongue at the base of each field terminal blade and withdraw the brush, spring and terminal assembly from the brush box. Check the brushes for wear. The brush length when new is 5/8 in (16 mm). If worn to, or approaching the wear limit of 5/16 in (8 mm) the brush assemblies should be renewed. New brush assemblies are supplied complete with their spring and 'Lucar' field terminal blade. It should be noted that the brush which bears on the inner slip ring is always connected to the positive side of the electrical system, since the lower linear speed of the inner slip ring results @ in reduced mechanical wear and helps to offset the higher rate of electrical wear peculiar to the positive connected brush. If the original brushes assemblies are to be re-used, clean them with a cloth moistened in petrol or white spirit, then dry thoroughly. Check the brushes for freedom of movement in their holders. If necessary lightly polish the brush sides on a smooth file, then clean off and refit. To reassemble the brushes to their holders, push each brush complete with its spring and terminal blade into its holder until the tongue on the terminal blade registers in the brush box. To ensure the terminal blades are properly retained, the tongue should be levered up with a small screwdriver to make an angle of about 30' with the terminal blade. Before refitting the brush box assembly, inspect the slip rings for any signs of damage or contamination. The surface of the rings should be smooth and free from oil or other matter. The easiest way of removing surface dirt from the slip rings is to press a petrol-moistened cloth through the hole in the end bracket and hold it in contact with the slip ring surface while rotating the pulley. If more serious contamination or damage is evident on the ring surface, the alternator must be partially dismantled to gain access. In this case the drive pulley and fan must first be removed to allow the three through-bolts to be unscrewed. The alignment of the end brackets and stator should be marked so that they may be reassembled in the correct angular relation to each other. The drive end bracket and rotor can then be separated from the stator and slip ring end bracket to allow inspection of the slip rings. The surface of the slip rings can be cleaned using very fine glass paper but on no account must emery cloth or similar abrasive be used. If badly scored, pitted or burned, the complete rotor assembly must be renewed. When inspection is completed, refit the brush box assembly to the slip ring end bracket and secure with the two retaining screws. Assemble the insulating pieces, washers and nuts on the output terminal. Overhaul If any repair work, other than replacing the brushes, is necessary it will probably be more economical and convenient to have the alternator repaired by an electrical specialist, or to exchange it for a replacement unit. 16 ACR Type In the 16 ACR alternator charging circuit, all the electrical components of the charging system are incorporated in the alternator. These include the control unit (voltage regulator) and the rectifier pack, which are mounted on the rear of the alternator under the black plastic cover. Several modifications have been made to the internal components of the 16 ACR alternator since its introduction. These mainly affect the voltage control unit which may be an 8TR, 11TR or 14TR on later models, but the termination is also different on later units, as improvements to the internal wiring have resulted in the elimination of the 'battery sensing' wire and the separate earth wire used on previous units. The alternator now earths through the unit casing. These later units have a single connector block with two leads to it, whereas earlier alternators have two connector blocks. Details of the wiring conversion necessary when fitting a later unit as a replacement for the earlier type are given under the appropriate heading below. It should be noted that the 16 ACR alternator is suitable only for fitment to vehicles having a negative earth electrical system. Removal& Installation Removal and installation is carried out in a similar manner to that described for the 11 AC alternator previously. Where a replacement unit with European termination is being fitted in place of an earlier type, the alternator wiring will have to be modified to suit and reference should be made to the heading below for details. Conversion to European Termination Later alternators have only one connector block at the rear instead of the two used on earlier units. This is due to improvements in the internal wiring which have resulted in the elimination of the 'battery sensing' wire (B+) and the separate earth wire (-) used on previous units. The connector block incorporates only two leads; one is the alternator main feed wire (+) and the other is the connection to the charge warning indicator light (IND). Earlier units have a two-way connector and an L, shaped three-way connector. These connector blocks can only be fitted one way round. The two-way connector block incorporates connections for the alternator main output lead (+) and the unit earth lead (-). The three-way connector block incorporates connections for the battery sensing lead (B+) and the charge warning light lead (IND) and a short link lead between the 'IND' connection and the third position in the connector block. When fitting a later unit in place of an early type one, the alternator wiring must be converted to suit the new connections. The use of the proper Lucas Plug Conversion Kit 54960402 is recommended. First, disconnect the battery. Cut off all the leads from the existing plugs after noting, or preferably labelling them with, their respective locations. Solder on the two new Lucar connectors supplied with the kit to the alternator main feed wire (+) and the charge warning light wire (IND). The large Lucar connector goes on the main feed wire, and the small connector on the 'IND' lead. Push first the small Lucar connector into its location in the European termination plug, then the large main lead connector into the adjacent slot in the plug, and snap on the Plug cover. Connect the plug to the alternator and secure with the clip. Discard the link wire and tape back separately the other leads from the original alternator. Finally, reconnect the battery. Voltage Regulator Remove the black plastic cover from the rear of the alternator. This is secured by two retaining screws with either cross heads or hexagon heads. In the latter case a small box spanner or socket will be required to release them. Identify the type of regulator fitted. The early 8TR type has two short mounting screws, one securing it along with the earth lead to the end bracket and the other securing it to the top of the brush box assembly 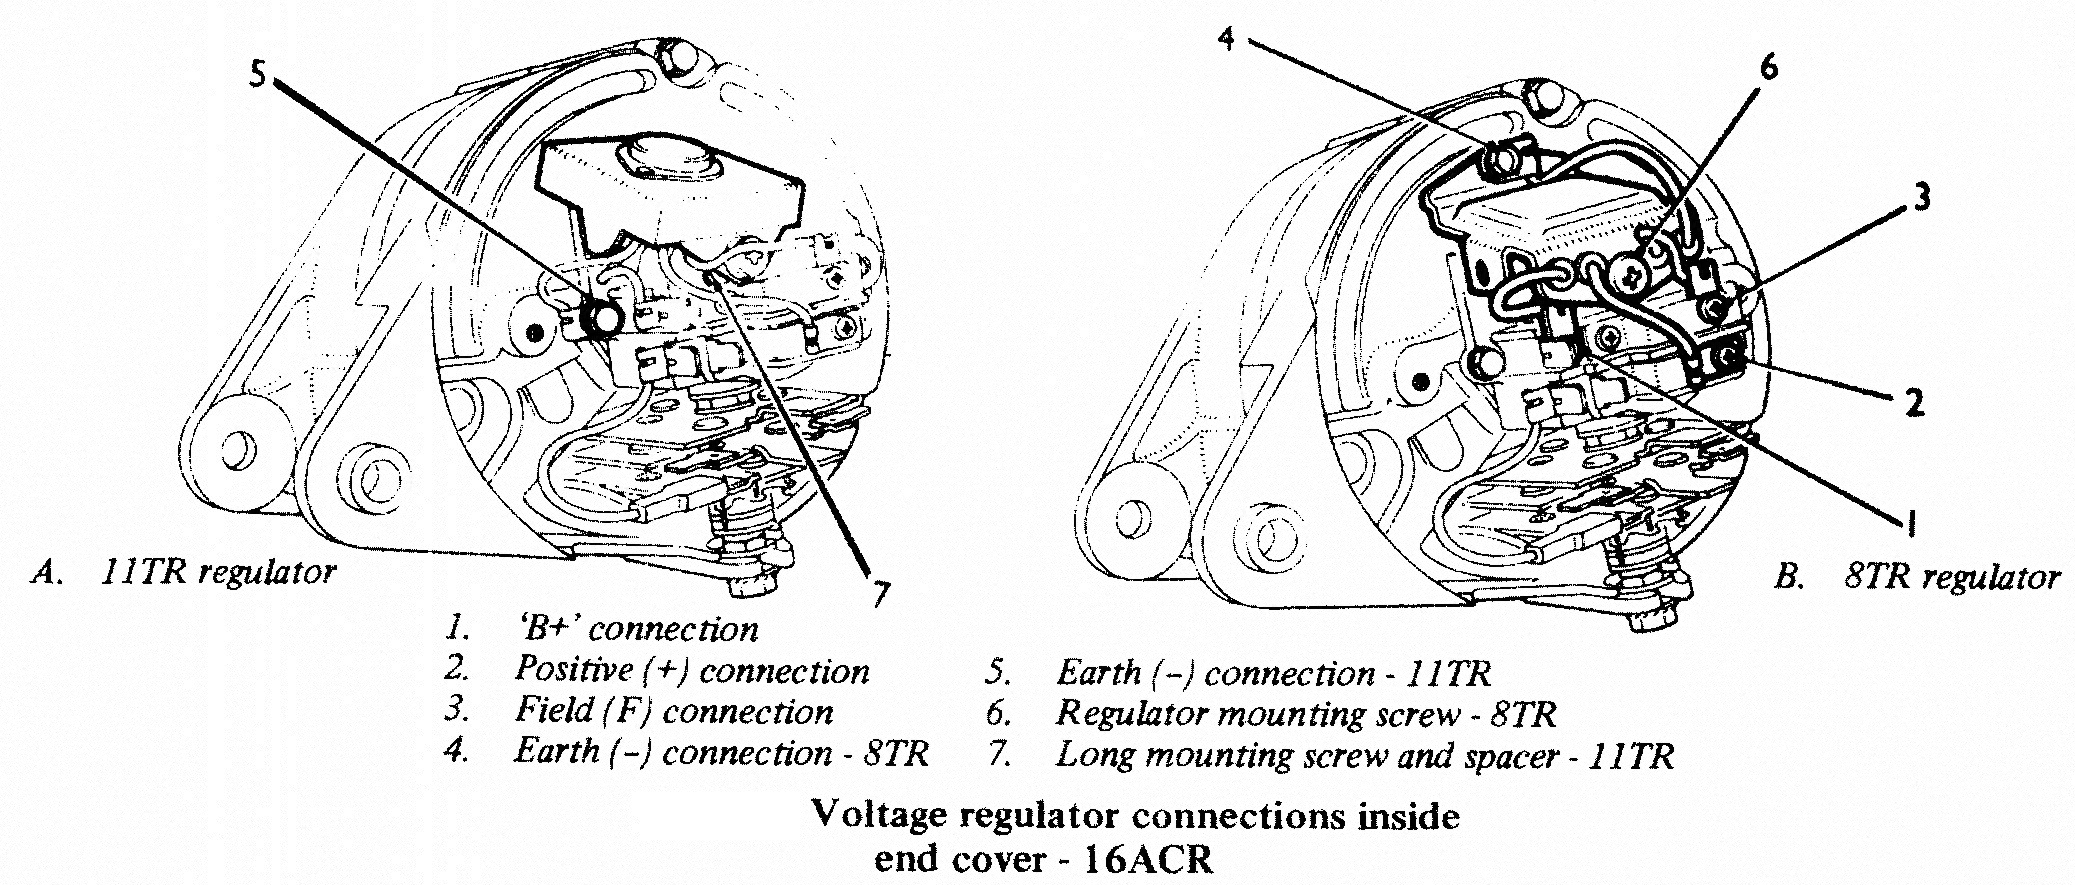 . The 11 TR type is secured by a single longer screw to the top of the brush box moulding only, and in this case a spacer is fitted between the brush box and the regulator flange. The earth lead is secured by one of the brush box mounting screws. Both of these units have four connecting leads. The later 14TR type regulator is similar to the 11 TR type but has only two leads, one an earth lead secured by one of the brush box mounting screws. . The 11 TR type is secured by a single longer screw to the top of the brush box moulding only, and in this case a spacer is fitted between the brush box and the regulator flange. The earth lead is secured by one of the brush box mounting screws. Both of these units have four connecting leads. The later 14TR type regulator is similar to the 11 TR type but has only two leads, one an earth lead secured by one of the brush box mounting screws. The regulator field connection in this case is by a flat connecting link between the regulator mounting screw and the adjacent brush assembly. Again an insulating spacer is fitted at the mounting screw. Carefully note the respective positions of the leads before disconnecting them. Disconnect the wiring connectors from the top of the brush box, and from the brush box securing screw, where applicable. Remove the screw (or screws - 8TR) securing the regulator and withdraw the unit. With the 14TR type it may be necessary to slacken the field link retaining screw to allow the field link to be moved aside. Where fitted, retain the small plastic spacer fitted between the regulator and brush box at the retaining screw. Position the new regulator on the brush box moulding and secure it in position. On 11 TR and 14TR units, ensure that the plastic spacer is correctly fitted, and on the 14TR unit also the connecting link. Reconnect the regulator leads to the positions noted previously. Refit the rear cover. Brushes The slip ring brushes are located in the brush box at the rear of the alternator and can be easily replaced if worn or damaged. First remove the alternator rear cover as described above for removing the regulator. Remove the four screws securing the two brush retaining plates and withdraw the brush assemblies from the brush box moulding 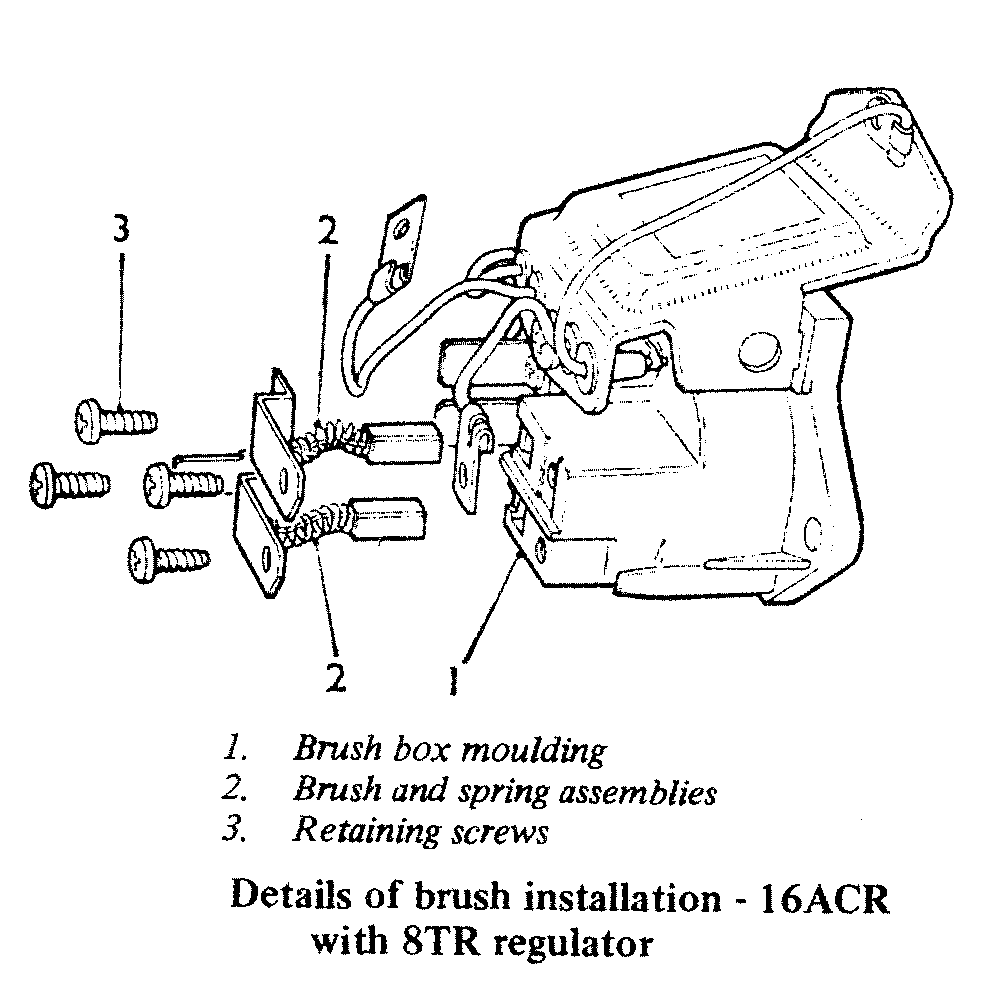 . Note the respective positions of the leads secured by brush plate screws before disconnecting them. With the 14TR type regulator, it may be necessary. to slacken the regulator mounting screw to allow the field connecting link to be moved aside. . Note the respective positions of the leads secured by brush plate screws before disconnecting them. With the 14TR type regulator, it may be necessary. to slacken the regulator mounting screw to allow the field connecting link to be moved aside.Fit the new brushes assemblies into the brush box and secure the retaining plates in position with the securing screws. Ensure that the various terminals are located as before at the screws. Refit the end cover. Alternatively, the complete brush box assembly, together with the regulator unit can be removed from the slip ring end bracket. This will allow inspection of the slip rings and the brush holders. Where a surge protection diode is fitted, first remove the screw securing the diode to the slip ring end bracket. The diode is then removed with the brush box assembly. Disconnect the brush box lead (and regulator lead where applicable) from the rectifier pack. Note the terminal to which the lead was connected for reassembly. Remove the screws securing the brush box and regulator to the slip ring end bracket and lift off the complete assembly. Note that the regulator earth lead is also secured by one of these screws. Inspect the brushes for wear. With the brushes in the free position, measure the amount by which they protrude beyond the brush box moulding. The brush length when new is 1/2 in (13 mm). If the amount protruding is worn to or approaching the wear limit of 1/4 in (6 mm), the brush assemblies should be renewed. Remove the old brush assemblies from the brush box and fit the new ones as detailed above. Check the new brushes for freedom of movement in their holders. Clean any brush which is stiff with a petrolmoistened cloth, or by lightly polishing the brush sides on a smooth file if necessary. Inspect the surface of the slip rings on the end of the rotor. If there is any evidence of roughness or burning this can usually be cleaned off with very fine glass paper, but on no account must emery cloth or similar abrasive be used. If the surface is badly scored, pitted or burned, the slip ring assembly on the rotor must be renewed. Before refitting the brush box, clean off any dirt which may have collected around the slip ring end bracket or the apertures in the plastic end cover. Check that the brushes are correctly positioned in their holders, then locate the brush box assembly on the slip ring end bracket and secure with the retaining screws. Ensure that the regulator earth lead is also secured by one of the screws. Where applicable, refit the surge protection diode in position on the end bracket. Reconnect the brush box lead (and regulator lead, where applicable) to the rectifier pack. Finally, refit the end cover. Overhaul If any repair work, other than replacing the brushes or regulator unit is necessary it will probably be more economical and convenient to have the alternator repaired by an electrical specialist, or to exchange it for a replacement unit. |