| CRANKSHAFT, CONRODS & PISTONS |
Removal 1. Remove the engine/transmission unit from the car, and separate the engine from the transmission unit as detailed previously. 2. Remove the cylinder head following the relevant steps given under the appropriate heading previously. 3. Invert the cylinder block so that it is resting on the cylinder head face. 4. For each piston and connecting rod in turn:- a) Turn the crankshaft as necessary to bring the connecting rod to the bottom of its travel. b) Check that the rod and big end bearing cap are suitably marked with their respective cylinder numbers. c) On 1275 GT models, release the multi-sided nuts securing the big end cap 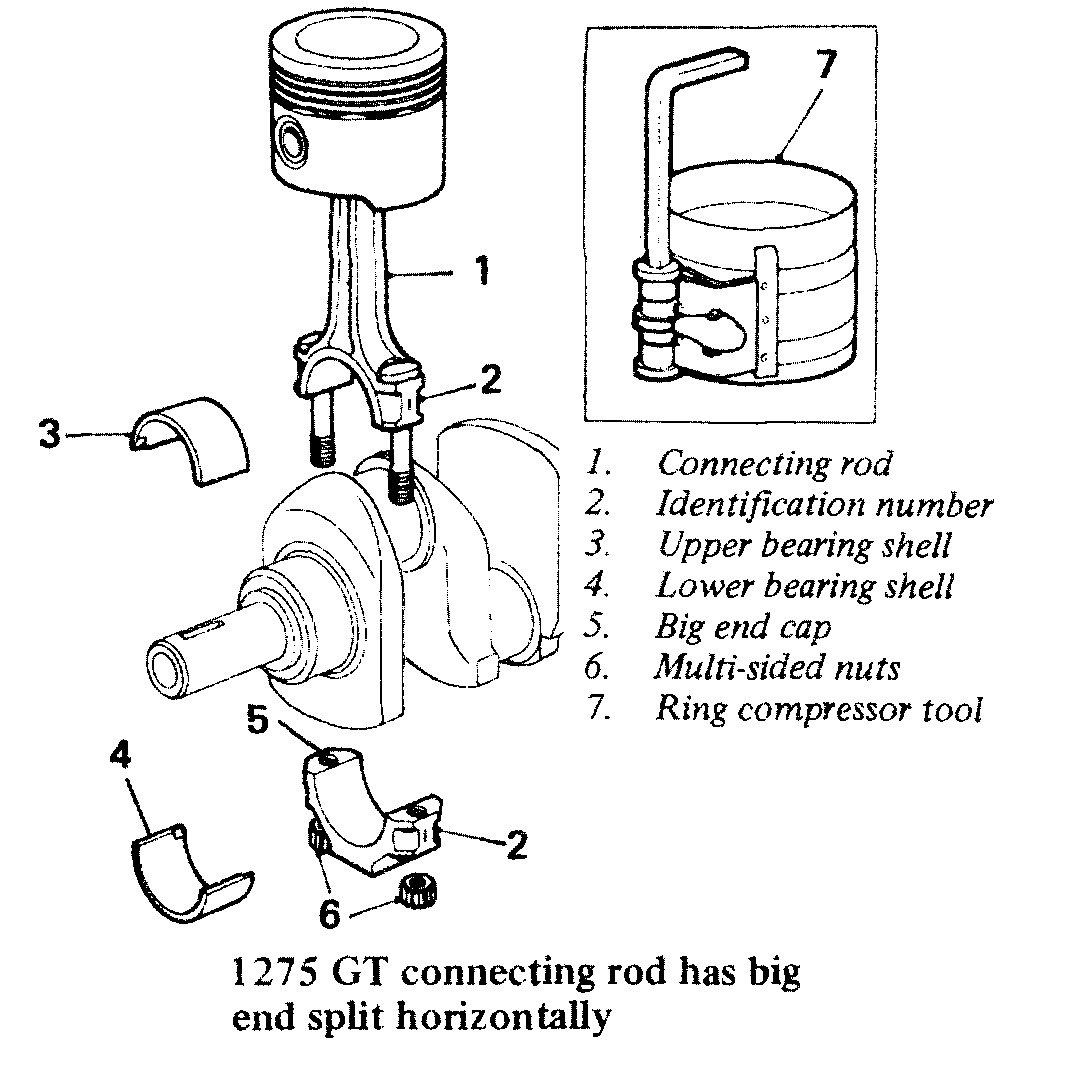 . Tap the ends of the studs with the handle of a hammer, or similar, to release the bearing cap and detach the cap together with its bearing shell. . Tap the ends of the studs with the handle of a hammer, or similar, to release the bearing cap and detach the cap together with its bearing shell.d) On all other models, release the locking plate tabs and unscrew the cap retaining bolts two or three turns 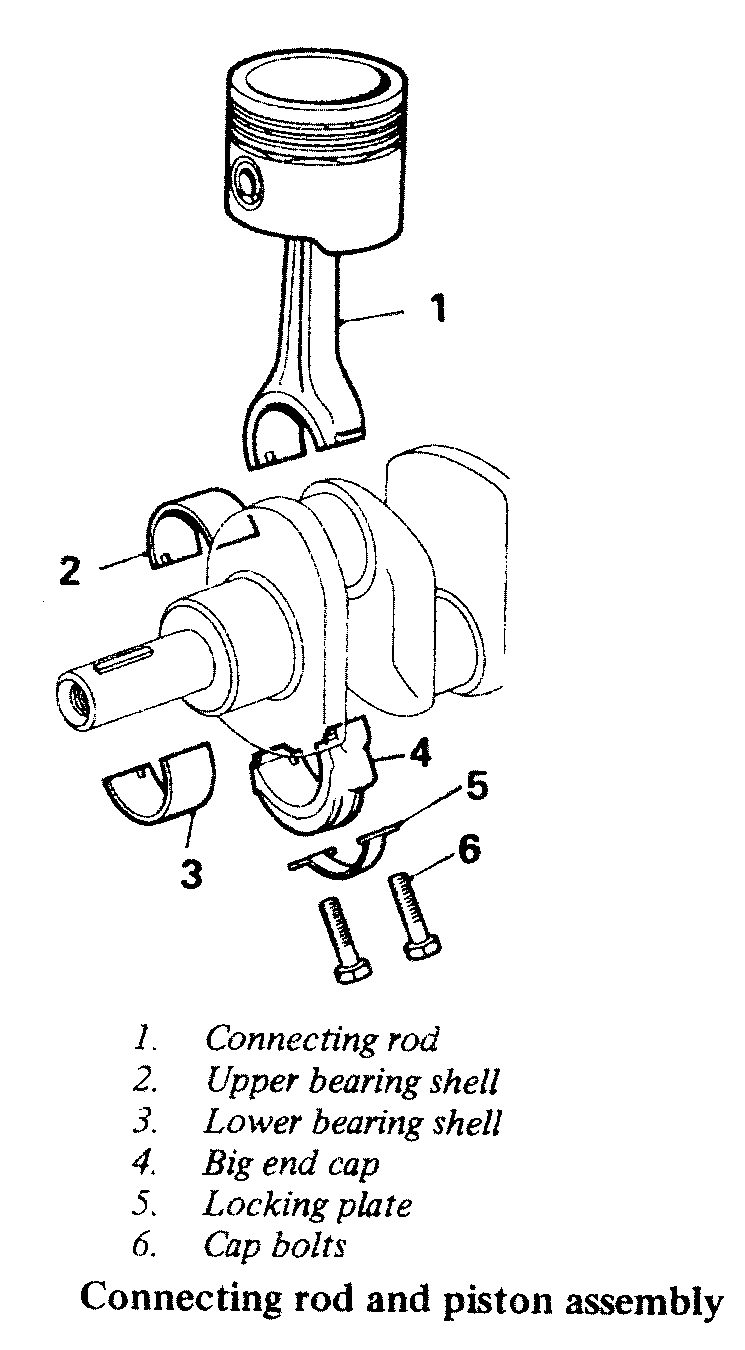 . Tap the bolts to release the big end bearing cap, then completely remove the bolts and locking plate and detach the cap together with its bearing shell. . Tap the bolts to release the big end bearing cap, then completely remove the bolts and locking plate and detach the cap together with its bearing shell. e) Push the piston and connecting rod assembly up the cylinder bore and carefully withdraw it from the top of the block. f) If required, remove the bearing shells from the cap and rod. Suitably identify the shells with their respective locations if they are to be re-used. 5. Remove the timing cover and the timing chain and gears as detailed previously. 6. Remove the generator/alternator adjusting link bracket. 7. Remove the three bolts securing the camshaft locating plate and lift off the plate. 8. Remove the retaining screws and detach the first adaptor plate from the front face of the cylinder block 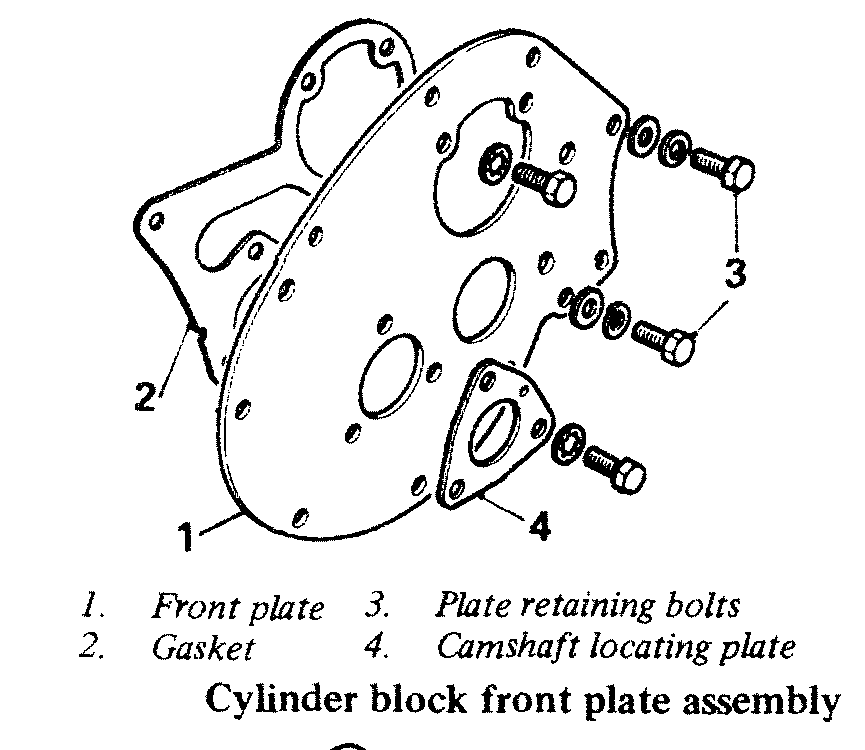 . .9. Withdraw the 'C' shaped thrust washer locating the crankshaft primary gear and slide the backing ring, primary gear and front thrust washer off the rear end of the crankshaft. 10. Check that the main bearing caps are suitably marked with their respective locations. 11. Release the cap retaining bolts and detach the three main bearing caps together with their bearing shells. The bottom halves of the crankshaft thrust washers will be removed with the centre main bearing cap 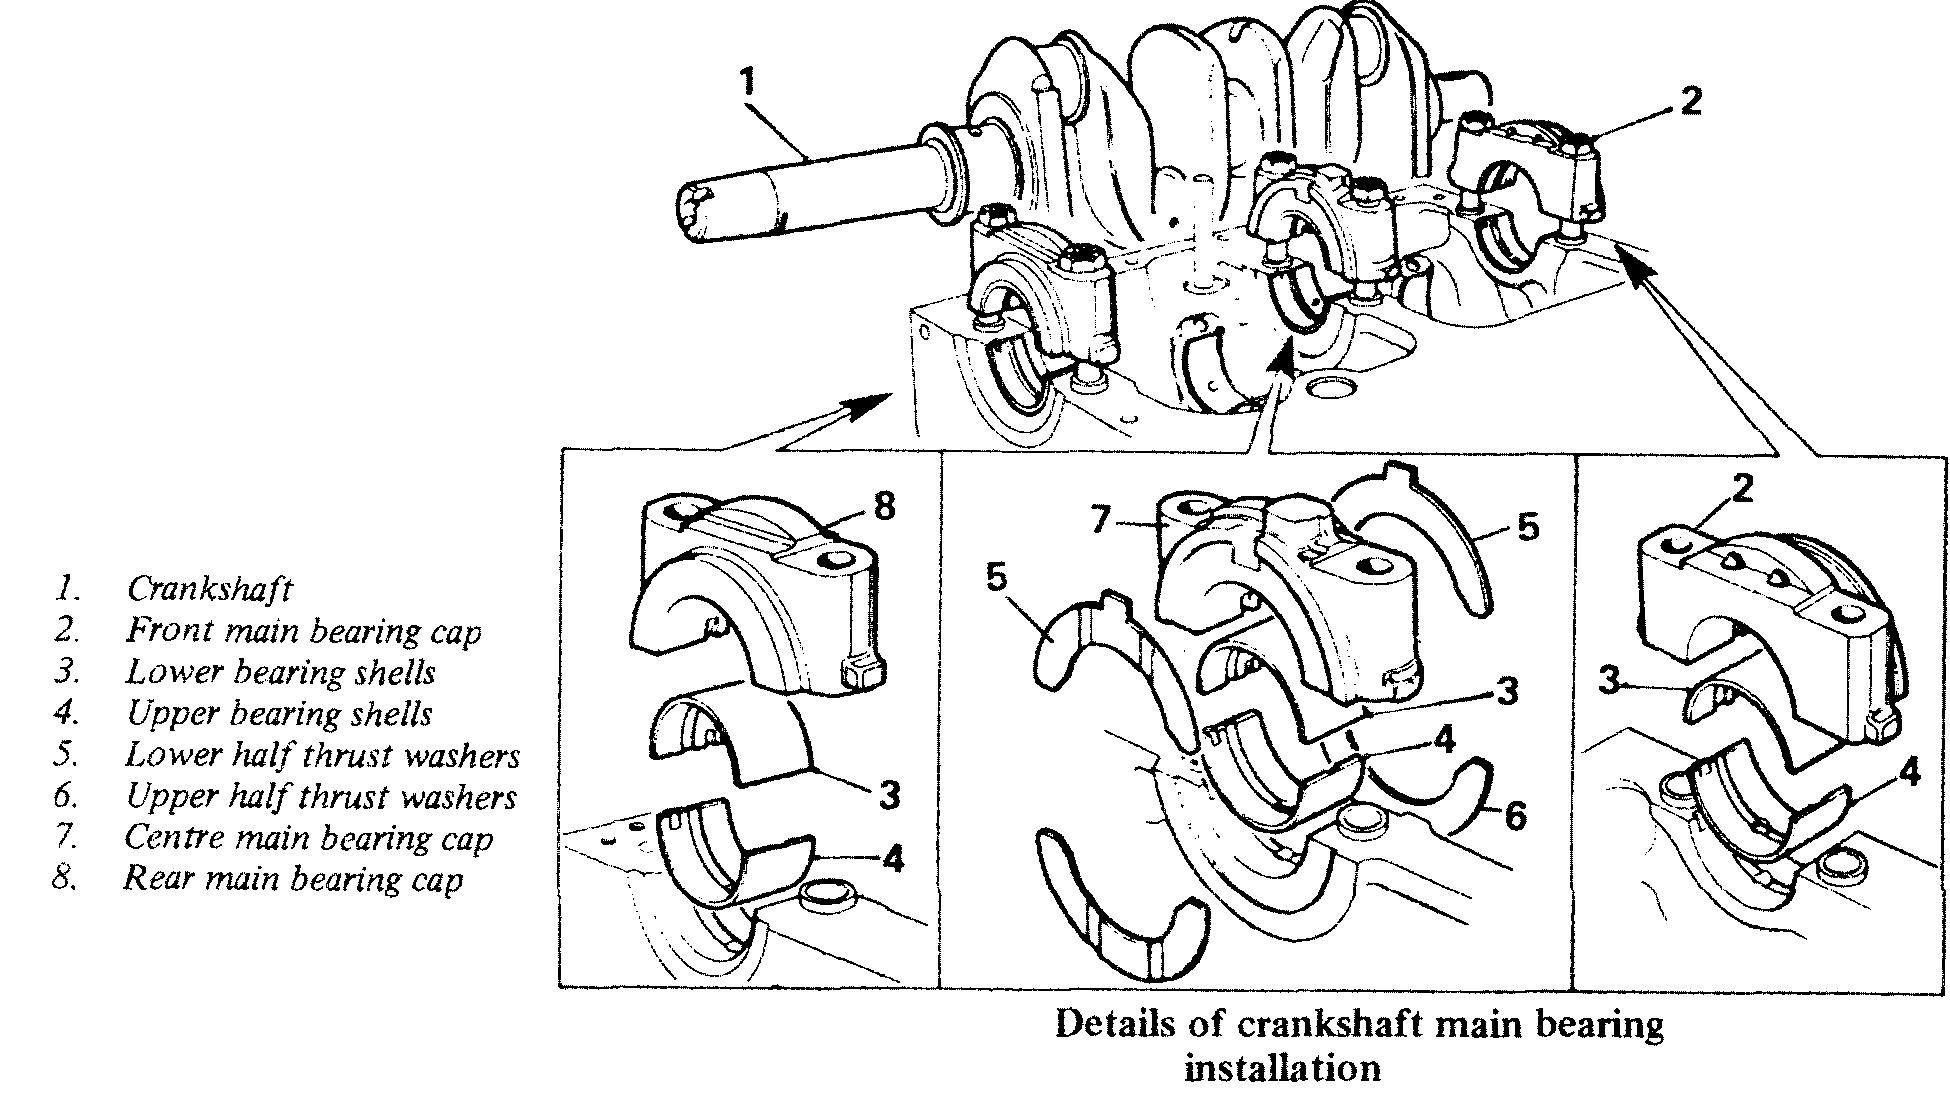 . .12. Carefully lift the crankshaft out of the crankcase. 13. Remove the remaining halves of the thrust washers from each side of the centre main bearing. 14. Remove the upper bearing shells from their locations in the crankcase. Identify the bearing shells and thrust washers if they are to be re-used. Inspection and Overhaul NOTE: The components of the cylinder head assembly have already been dealt with under the heading 'CYLINDER HEAD'. Cylinder Bores Inspect the cylinder walls carefully for any signs of damage, i.e. scoring, scuffing or roughness. Examine the top of the bore at the limit of piston travel for evidence of a ridge or step, especially at right-angles to the crankshaft axis, indicating bore wear. If the bores appear in reasonable condition they should be checked for taper and ovality with an accurate internal micrometer. Pistons Three different methods of retaining the piston pin are used depending on application, and each requires a different dismantling technique. In each case, ensure that the cylinder number and the relationship of the piston to the connecting rod is suitably marked before dismantling as the big end offset may be positioned either at the front or at the rear of the assembly, depending on the location of the rod in the engine. On 848 cc models the piston pin is clamped in the connecting rod small end by a clamp bolt  . To remove the piston pin, hold the pin in a vice between two plugs to avoid damaging the piston, and unscrew the clamp bolt. Push out the piston pin and separate the piston from the connecting rod. . To remove the piston pin, hold the pin in a vice between two plugs to avoid damaging the piston, and unscrew the clamp bolt. Push out the piston pin and separate the piston from the connecting rod.998 cc and 1098 cc models have fully-floating piston pins which are located in the piston by a circlip at each end  . Mark the piston and pin before dismantling to ensure that the pin is refitted in the same side of the piston from which it was removed. Remove the cir. clips and press out the piston pin by hand. It may be necessary to expand the piston by immersing it in hot water to enable the pin to be removed. . Mark the piston and pin before dismantling to ensure that the pin is refitted in the same side of the piston from which it was removed. Remove the cir. clips and press out the piston pin by hand. It may be necessary to expand the piston by immersing it in hot water to enable the pin to be removed.On 1275 GT models, the piston pin is a press fit in the connecting rod small end, and only the interference fit of the pin in the small end retains it in position. The piston pin can sometimes be driven out using a suitable drift, but there is a real danger that the piston may be damaged or distorted during this operation. It is best to have the pin pressed out and refitted by an Authorised Dealer or Specialist who will have the proper tools to carry out this job. As before, the piston and pin should be suitably marked before dismantling. The 848 cc, 998 cc and 1098 cc pistons have the piston pin bore offset in relation to the centre-line of the piston. When installed in the engine, the offset must be towards the camshaft side and therefore it is essential that the pistons are correctly fitted to their respective connecting rods. The word 'FRONT' or arrow head symbol on the piston crown must be towards the front of the engine, and the number stamped on the connecting rod and cap facing towards the camshaft side of the engine. The 1275 GT pistons do not have an offset piston pin bore but the piston will normally still have the front side marked for ease of fitment. Piston Rings It is recommended that new piston rings be fitted as a matter of course when overhauling the engine. Where new rings are being installed in a used cylinder, the glaze must first be removed from the cylinder wall. A proper Glaze Breaker tool should ideally be used for this purpose, but in its absence fine emery cloth can be used instead. In this latter case, ensure that all traces of abrasive are cleaned off the cylinder walls when the job is completed. Before fitting the rings to the pistons, check the endgap of each piston in its respective cylinder bore with the feeler gauges 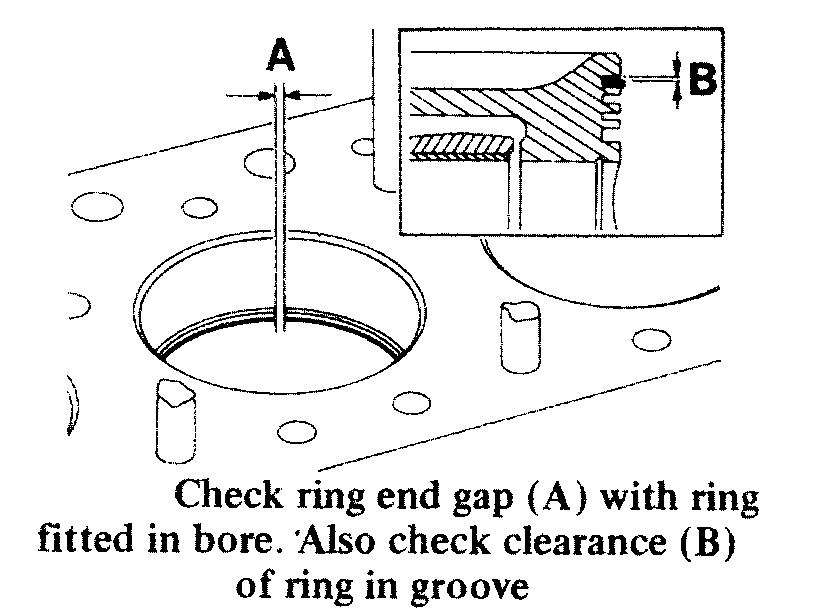 . Use an inverted piston to position the ring squarely in the bore. If the gap is outside the specified limits, try another ring set. . Use an inverted piston to position the ring squarely in the bore. If the gap is outside the specified limits, try another ring set.Also check the fit of each ring in its respective piston groove. The ring should seat easily in the groove and be able to rotate freely around the circumference of the groove without binding. Connecting Rods In the 848 cc, 998 cc and 1098 cc engines, the connecting rod big end is split at 450, but the big end bosses on alternate rods are offset to different sides of the assembly in relation to the rod centre line. The odd pair of rods have the offset to the rear and the even pair have it to the front 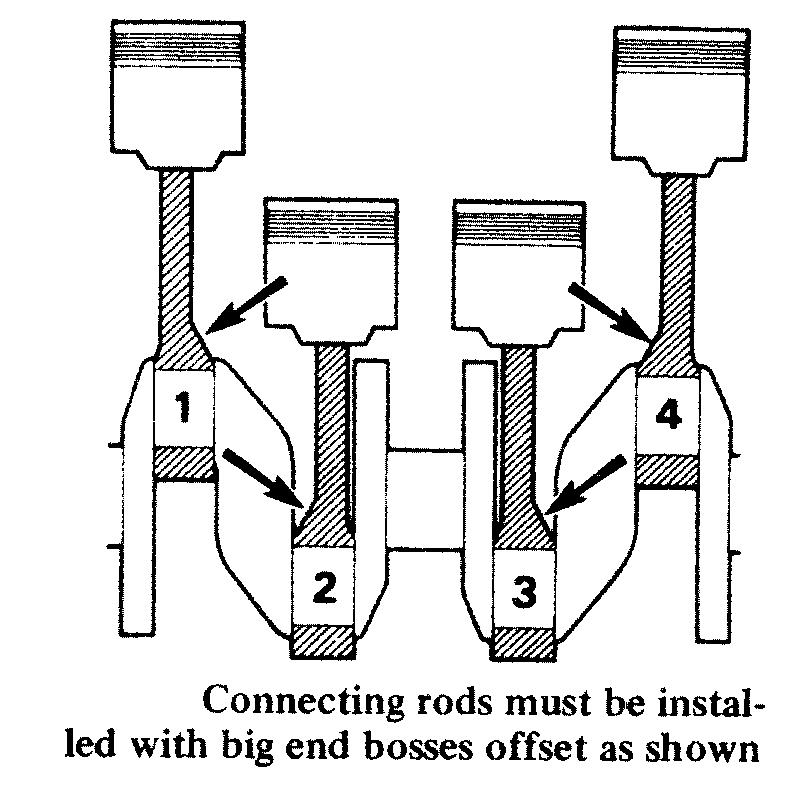 . The connecting rod assemblies for No. 1 and No. 3 cylinders are identical and are interchangeable when new, as are those for the No. 2 and No. 4 cylinders. However, when refitting used parts it is essential that they should be fitted in their original positions. . The connecting rod assemblies for No. 1 and No. 3 cylinders are identical and are interchangeable when new, as are those for the No. 2 and No. 4 cylinders. However, when refitting used parts it is essential that they should be fitted in their original positions.These rods, once installed in the engine, must be located with the big end split angled upwards towards the camshaft side of the engine . The stamped number on the rod and cap, where present, should also face towards the camshaft. With the clamped-type rod, the small end clamp bolt should also be on the camshaft side of the assembly.In the 1275 GT engine, the connecting rod bosses are also offset, but, as the big end is split horizontally, all the rods are similar and interchangeable. Where the rods are numbered, this is normally marked on the camshaft side of the assembly .The connecting rods used in the 1098 cc engine differ from the others in that they have a bronze bush fitted at the small end, and this can be replaced if worn or damaged 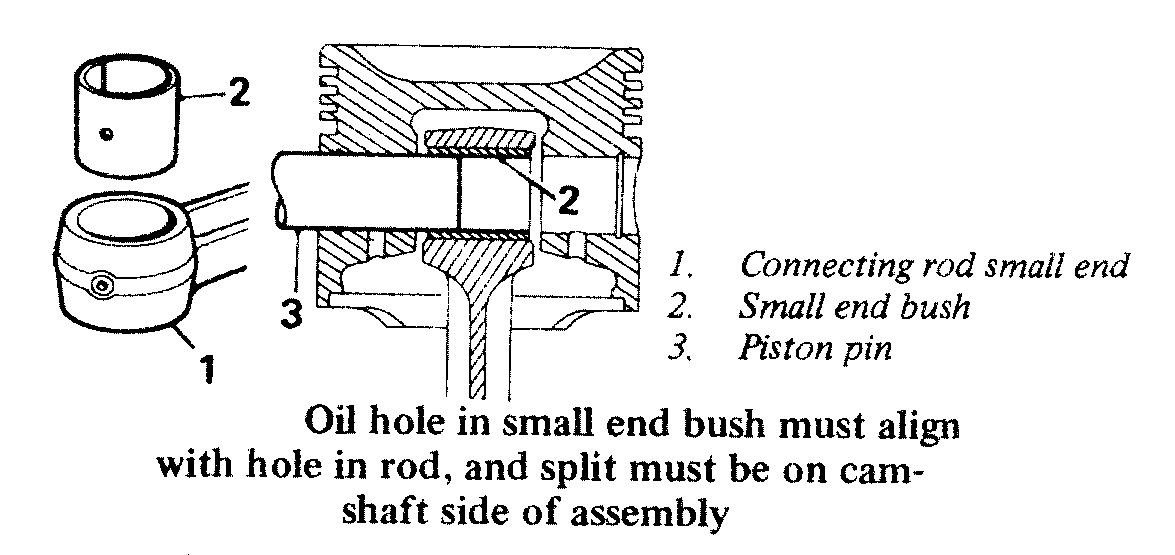 . All the others have a plain small end. The old bush must be pressed out and a new one pressed in, then the bush reamed to size. This job is best left to a Specialist who will have the proper equipment to carry out the work. . All the others have a plain small end. The old bush must be pressed out and a new one pressed in, then the bush reamed to size. This job is best left to a Specialist who will have the proper equipment to carry out the work.Crankshaft Inspect each bearing journal for signs of scratches, grooves or other damage. The diameter of each journal should be measured in at least four places with an accurate micrometer to determine taper, ovality or undersize. If wear is excessive or if any of the journal surfaces are severely marred, the crankshaft should be reground or replaced. If any journals will not clean up within the minimum specified regrind diameter, the crankshaft must be replaced. Main & Big End Bearings, and Thrust Washers The bearing surface of each bearing shell should be inspected carefully for signs of chips, pitting or excessive wear. The bearing base may be visible, but this does not necessarily mean that the bearing is excessively worn. It is not necessary to fit new bearing shells in this case unless the bearing clearance is outside the specified limits. Check the clearance of bearings which appear to be satisfactory, as described below. Inspect the thrust washer halves in a similar manner to the bearing shells and replace if worn or damaged. Bearing Clearances The procedure given below is for checking the main bearing clearances, but the big end bearings are checked in a similar manner. 1. Ensure that the crankshaft surface, bearing shells and bearing caps are perfectly clean and free from oil and dirt. 2. Fit the upper halves of the bearing shells into their locations in the crankcase, then carefully lower the crankshaft into place in the crankcase. 3. Fit the lower half of the shell into the cap of the bearing being measured. 4. Place a piece of Plastigage across the full width of the crankshaft journal and about 1/4 in (6 mm) off-centre  . .5. Plastigage is a trade name for an accurately calibrated plastic filament and is available in three different diameters for the range between 0.001 and 0.009 in (0.025 - 0.23 mm). In most cases the small diameter Type PGI (Green) pack for the range 0.001 - 0.003 in (0.025 - 0.075 mm) will suffice. 6. Install the main bearing cap and tighten the cap bolts to their normal specified torque of 63 lb ft (8.7 kg m). None of the remaining bearing caps must be fitted during this procedure. Each bearing must be measured individually. 7. Release the cap bolts and remove the bearing cap. Note that the crankshaft must not be moved while the Plastigage is in position. 8. Measure the width of the compressed plastic filament, using the scale provided on the Plastigage pack 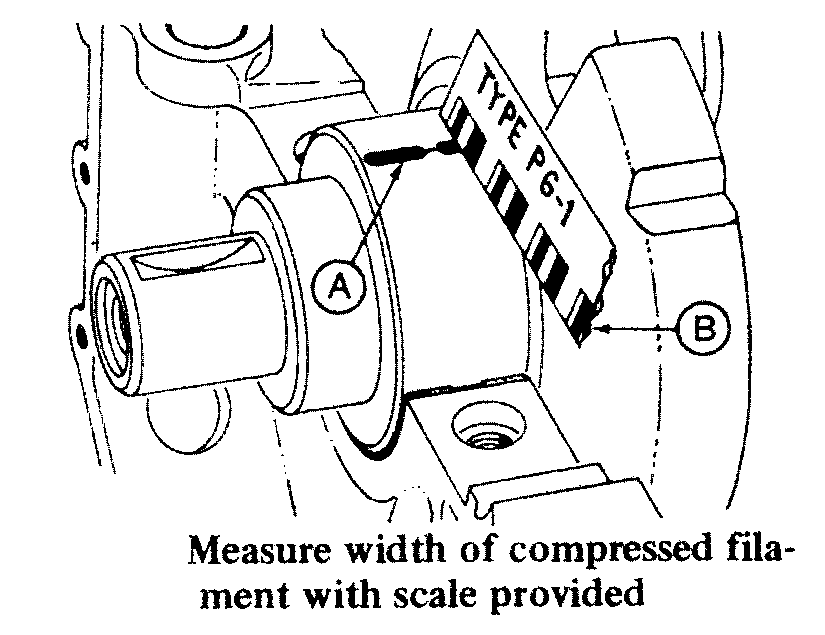 . The widest point will give the minimum clearance and the narrowest point the maximum clearance. The difference between the two readings will therefore give the taper on the journal. . The widest point will give the minimum clearance and the narrowest point the maximum clearance. The difference between the two readings will therefore give the taper on the journal.9. To check the journal for ovality, clean all traces of Plastigage material from both the journal and bearing shell. Rotate the crankshaft a quarter of a turn and repeat the measuring procedure. The difference between the two readings will indicate the out-of-round of the journal. 10. When measurement is completed, clean all Plastigage material off both bearing shell and crankshaft journal. This is most important. Installation 1. Install the crankshaft in the reverse order of removal, with special attention to the following points - a) Ensure all oilways in the crankshaft are clear. This can be done by blowing out the passages with an air line, but in some cases it may be necessary to probe the passages with a piece of wire. b) If the original bearing shells are being re-used, ensure that they are refitted in their original locations. c) Ensure that the locating tag on each bearing shell correctly engages the corresponding notch in the crankcase or bearing cap. d) Fit the half thrust washers on each side of the main bearing and cap with the oil grooves facing away from the bearing housing . The tab on the lower washers must locate in the slot on the centre main bearing cap. e) Ensure that all the bearing surfaces are perfectly clean, then lubricate the bearing surfaces with clean engine oil before assembly. f) Ensure that the bearing caps are refitted in their correct positions, indicated by the identification marks made previously. g) Tighten the cap bolts evenly to their specified torque of 63 lb ft (8.7 kg m), then check that the crankshaft rotates freely and smoothly. 2. Check the crankshaft end-float using either a dial gauge or feeler gauges. In the former case, locate the dial gauge with the stylus in contact with the machined surface of the crankshaft throw, then lever the crankshaft fully forward and zero the dial gauge. Lever the crank in the opposite direction and note the gauge reading. If the end float exceeds the specified limits of 0.001 - 0.005 in (0.025 - 0.127 mm), rectify by selecting and fitting new thrust washers of the required thickness. If feeler gauges are being used, measure the clearance between the thrust washers and the crankshaft face with the crankshaft pushed fully in one direction. a) When fitting used parts it is essential that they be refitted in their original positions. b) The cylinder number on the piston should match that on the connecting rod and cap. c) The 'FRONT' or arrow head marking on the piston crown must be positioned to the front, and the number stamped on the connecting rod and cap must be to the left-hand side (camshaft side) of the assembly . d) Check that the big end boss has the correct offset. The odd (1 and 3) pair of rods have the offset towards the rear of the engine, and the even (2 and 4) pair have it towards the front . e) Apply a light coat of graphited oil to the piston pin and the bosses in the piston and connecting rod, then fit the piston pin. The pin should be a thumb push-fit at normal room temperature (20' C). f) Tighten the small end clamp bolt, or secure the pin in the piston with the two retaining circlips, as appropriate. In the latter case ensure that both circlips seal correctly in their grooves. g) On 1275 GT models the piston pin is an interference fit in the connecting rod small end and must be pressed into place. This operation is best left to an Authorised Dealer or Specialist who will have the proper equipment to carry out the job. 4. Assemble the piston rings on the piston, following the instructions supplied with the new rings. The rings must be fitted from the top of the piston. The rings will normally be marked 'TOP' on one face, and this side should face towards the piston crown  . Service rings for use in worn bores normally have a stepped top ring to avoid the wear ridge at the top of the bore. It is most important that these rings be fitted with the stepped portion uppermost, otherwise breakage of the rings will result when the engine is run. Where possible, proper piston ring pliers should be used to expand the rings when fitting them as this will eliminate the possibility of ring breakage or damage to the piston. . Service rings for use in worn bores normally have a stepped top ring to avoid the wear ridge at the top of the bore. It is most important that these rings be fitted with the stepped portion uppermost, otherwise breakage of the rings will result when the engine is run. Where possible, proper piston ring pliers should be used to expand the rings when fitting them as this will eliminate the possibility of ring breakage or damage to the piston.5. For each piston and connecting rod assembly in turn:- a) Lubricate the cylinder bore and piston rings liberally with clean engine oil. b) Install the piston assembly in its correct respective bore with 'FRONT' or arrow head mark on the piston crown pointing towards the front of the block. c) Position the piston rings so that their gaps are spaced out equally on the non-thrust side of the piston. d) Compress the piston ring using a proper ring compressor tool, such as that shown in . Do NOT attempt to fit the pistons by hand otherwise breakage of the rings may result. Carefully tap the piston into the cylinder bore, using the handle end of a hammer, until the piston crown is slightly below the top of the cylinder. Take great care to avoid the connecting rod hitting the crankshaft journal.e) Fit the bearing shells dry in the connecting rod and caps, ensuring that the locating tag on each shell correctly engages the corresponding notch in the bearing housing. f) Coat the crankshaft journal and bearings liberally with engine oil, then pull the connecting rod assembly down firmly onto the crankpin and fit the cap to the rod. g) Check that the identification numbers on the cap and rod match, and are on the same side of the assembly .h) On 1275 GT models, ensure that the cap is correctly located, then fit the two multi-sided nuts and tighten to their specified torque of 33 lb ft (4.6 kg m). i) On 850, 1000 and 1100 models, fit the big end cap bolts with a new locking plate and tighten to their specified torque of 37 lb ft (5.1 kg m). Tap over the locking plate tabs to secure .j) Check that the connecting rod has sufficient end-float on the crank-pin. 6. Refit the adaptor plate to the front face of the cylinder block, using a new gasket, and tighten the securing screws .7. Refit the camshaft locating plate, with the white metal side towards the camshaft journal, and secure with the three bolts. 8. Refit the generator/alternator adjusting link bracket on the cylinder block. 9. Reassemble the timing chain and gears, and the timing cover as detailed under the appropriate heading previously. 10. Refit the crankshaft primary gear assembly, and check and adjust the gear end-float, if necessary, as detailed previously. 11. Refit the cylinder head assembly, noting the points given under the heading 'CYLINDER HEAD' earlier in this section. 12. Finally, assemble the engine to the transmission casing and refit the power unit in the car. Refer to the appropriate headings previously for details of any special points of note. |