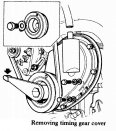
On most models the timing cover can be removed while the engine is in the car, as these have a split-type fan cowling. However, early models had a one-piece fan cowling, and where this is fitted the engine must first be removed.
1. Remove the radiator as described in the COOLING SYSTEM section.
2. Slacken the dynamo/alternator mounting bolts, release the fan belt tension and remove the fan belt.
3. Remove the front retaining bolts and detach the fan blades and drive pulley from the water pump hub.
4. Bend back the locking washer tab and unscrew the crankshaft pulley retaining bolt, then carefully lever the pulley off the crankshaft.
5. On 1275 GT models, disconnect the engine breather hose from the timing cover.
6. Remove the bolts securing the timing cover flange to the engine front plate and detach the timing cover and gasket
 .
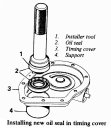
.7. Extract the old oil seal from the timing cover and check that the bore in the timing cover is clean and undamaged.
8. Lubricate the bore and outside diameter of the new seal with grease and press the seal squarely into place in the cover. It should be possible to press the seal in by hand, but if necessary the seal can be driven home by bearing on the metal outside diameter of the seal
 . In this case the timing cover should be firmly supported around the seal location to avoid disturbing the cover.
9. Ensure that the mating faces on both the timing cover and engine front plate are clean and free of old gasket material.
10. Locate a new gasket on the face on the engine front plate, using grease to hold it in position.
11. Ensure that the oil thrower on the crankshaft is fitted with the face marked 'F' away from the engine. On early type engines the thrower is unmarked and should be fitted with its concave face away from the engine.
12. Refit the timing cover and centralise the oil seal using the crankshaft pulley. It will avoid damage to the new seal if the sealing lips are first lubricated with oil or grease.
13. Fit and tighten the cover retaining bolts, then fit the crankshaft pulley bolt with a new lock washer. Tighten the pulley bolt to its specified torque of 75 lb ft (10.3 kg m) and secure by bending over the lock washer tab.
14. Refit the fan belt and adjust the belt tension so that a free-play of approximately 1/2 in (13 mm) exists at the midway point along its longest run, then tighten the dynamo/alternator mounting bolts.
15. Finally, refit the radiator and refill the cooling system.